S7 Room Types & Coverage Planning
Use with S3 Placement before fixing the wall plate in S4.
Environment rules → S6.2. This chapter is about coverage and mount position only.
7.1 Single-unit coverage
External copy often says ~100° FOV, ~5 m radius — for planning and multi-radar layouts, use the blue zone in S2.4.
| Topic | Notes |
|---|---|
| Shape | Top view: 100° fan; straight boundary rays (dashed in diagrams); effective 0.5–5 m from apex |
| Near apex | 0.5 m weak zone = small fan at apex, same 100° — not a gray strip along the wall |
| Swivel | ±45° horizontal after mount (S4.3) |
| Height / tilt | Still 2.5 m / 30° per S3; unchanged at wall corners |
Workflow: mark must-cover areas on a floor plan → draw each unit’s blue zone → confirm activity falls inside → site walk-through before fixing.
7.2 By space shape
A. Bed / sleep spaces
For: your bedroom, hotel / B&B room, care-home single — anywhere you need bed exit and fall awareness.
Three questions first
- What must you cover? — Bed surface, the path from bed to door/bath, and floor where a fall matters.
- Wrong wall — Not above the headboard (pillow zone only). Mount on the long side wall at the foot of the bed, looking across the bed and walkway.
- Left or right on that wall? — If desks/cabinets crowd one side and people use the other, mount toward the busier side; you can still swivel ±45° after install.
If coverage doesn’t reach every corner
- Prioritize bed + path + floor; skip minor corners if needed.
- Avoid beaming into windows, mirrors, big metal (S6.2).
- Fixed bed/cabinet? Set exclusion zones on the platform (not a substitute for good placement).
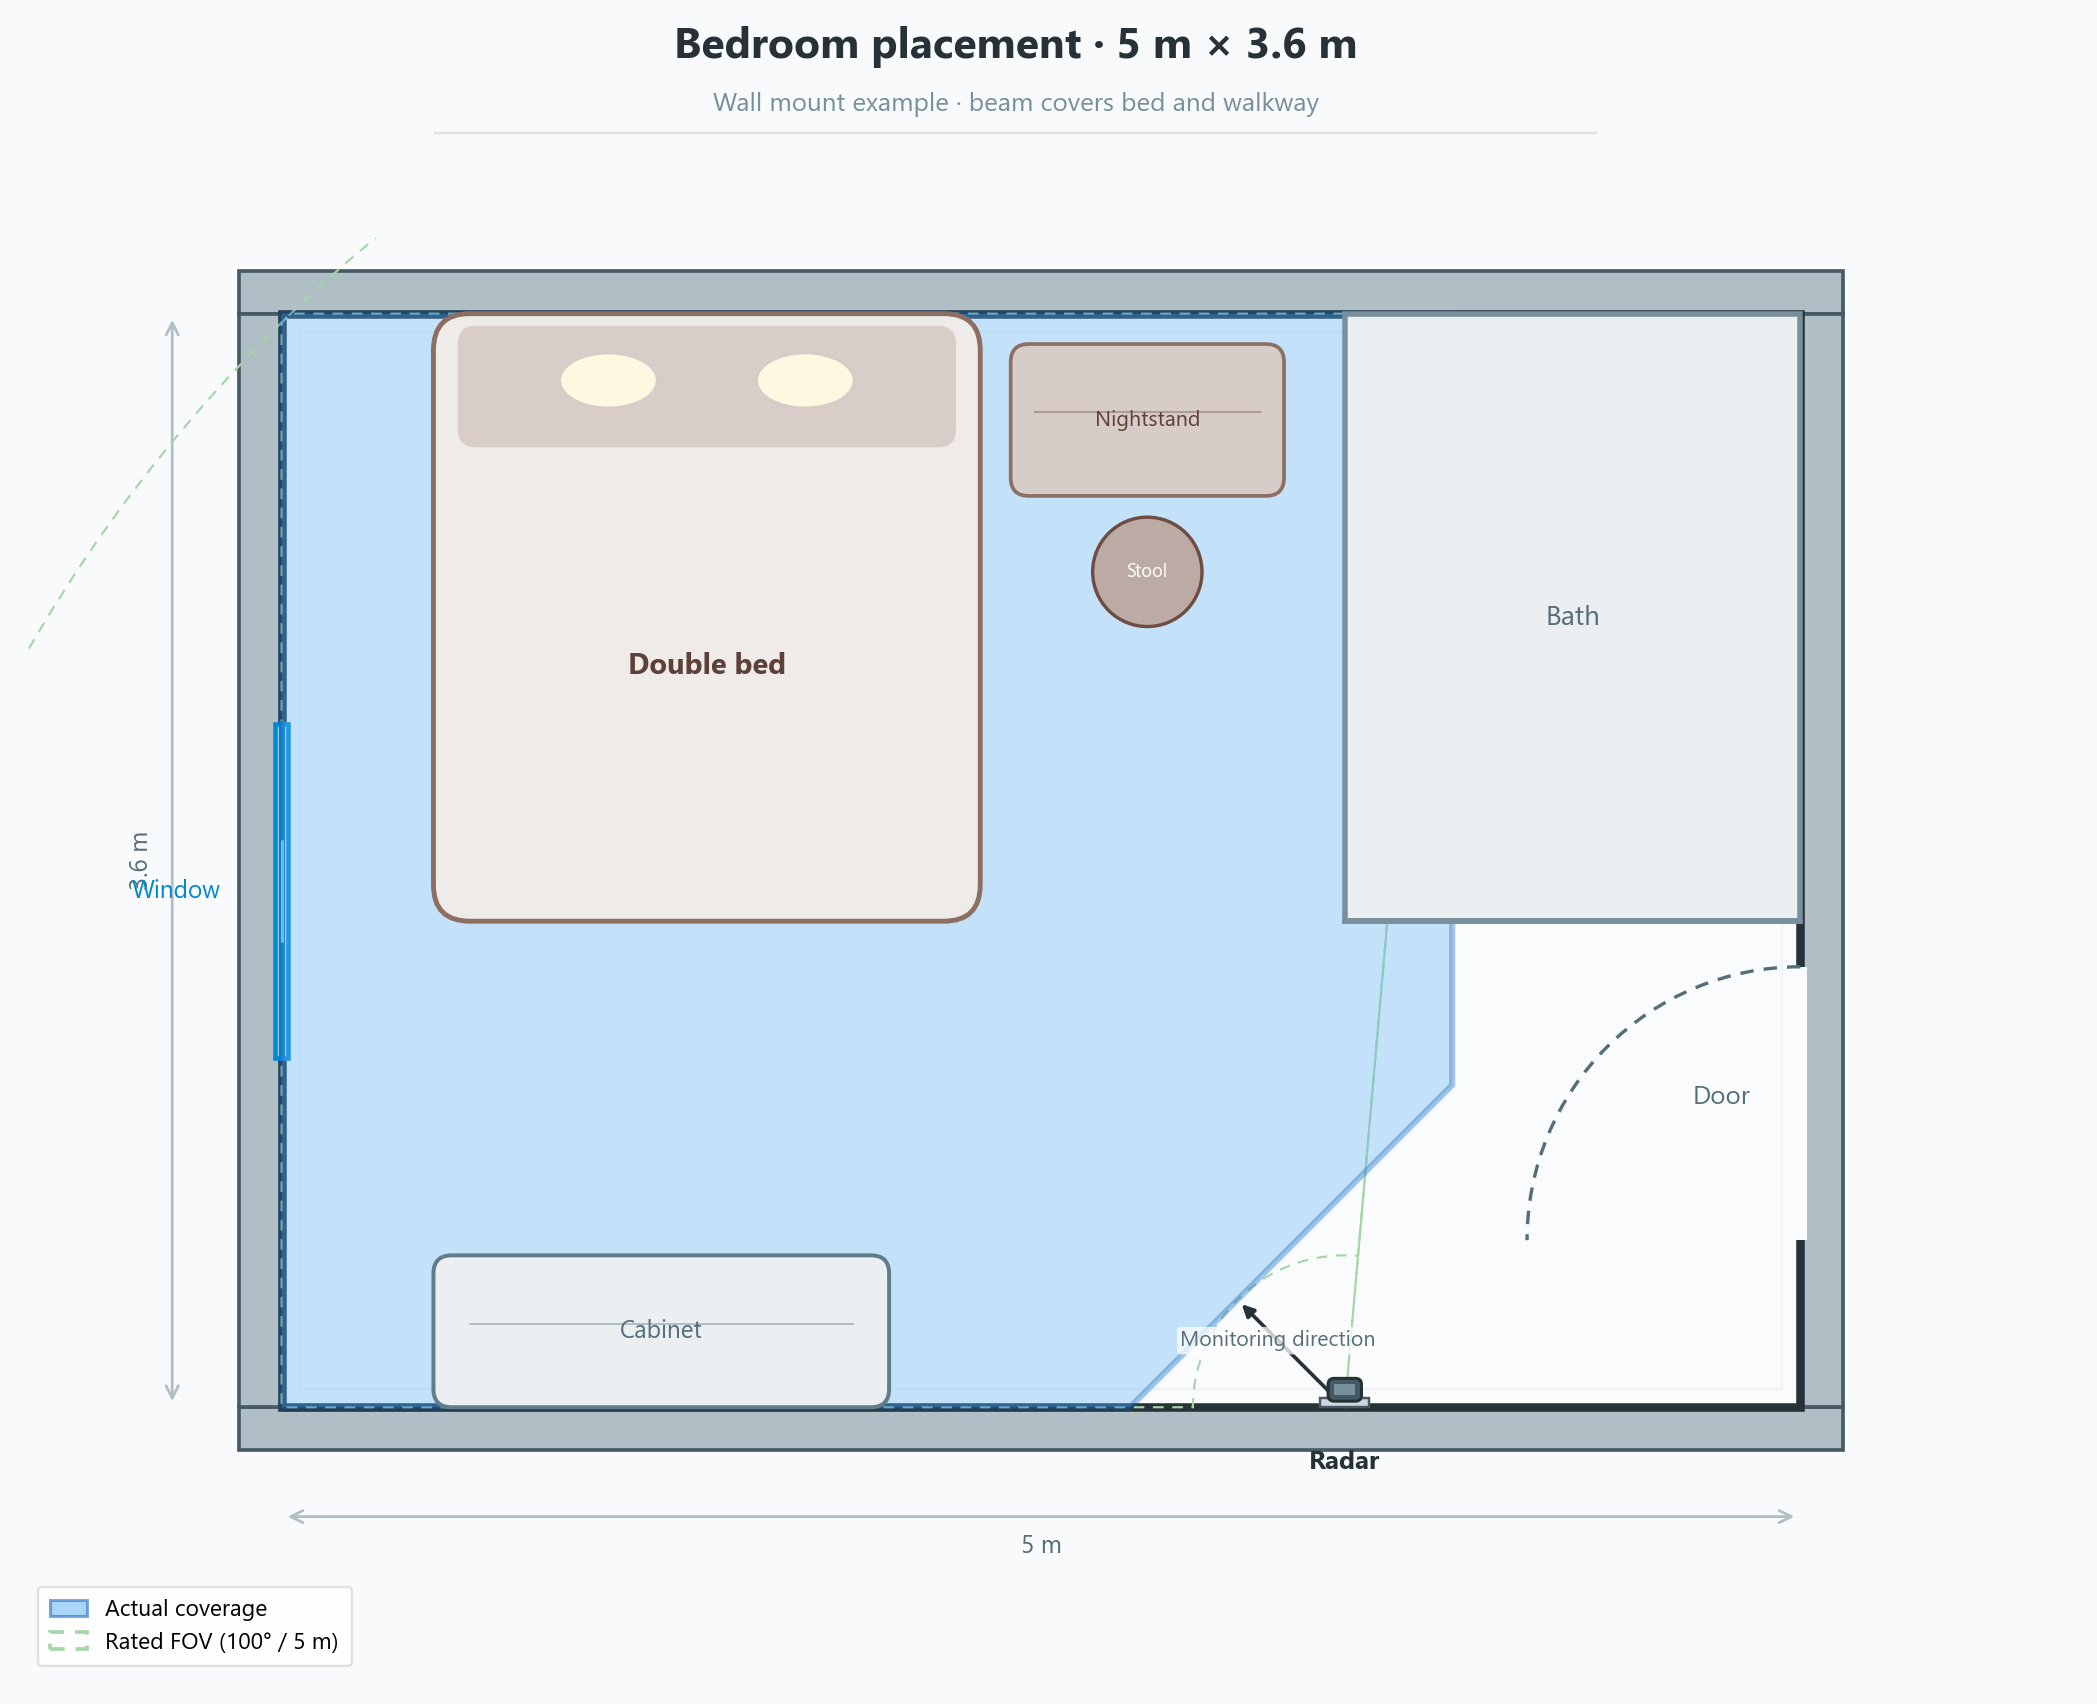
Example 5 m × 3.6 m bedroom: radar wall-mounted on the foot wall, beam 45° up-left toward the bed and walkway. Blue = actual coverage; green dashed = rated FOV (100°, 5 m) for comparison.
Reading the diagram
- Blue solid = actual coverage — use this when choosing a spot (same as S2.4)
- Green dashed = rated 100° / 5 m FOV from the manual
- Keep the beam off-axis from the window on the left (S6.2)
B. Activity / living spaces
Examples: living/dining room, lounge, small office open area.
| Item | Guidance |
|---|---|
| One unit | Often enough for ~5×5 m or smaller with one activity cluster |
| Two-unit example | 8×4 m open living-dining below: one on top wall at x≈4.5 m, one on foot wall at x≈4.5 m |
| Mount | Side wall facing the activity zone, or segmented foot/side wall; avoid face-to-face beams |
| Beam | Cover walkways and fall-risk floor; fine-tune with ±45° |
| Reflectors | S6.2 |
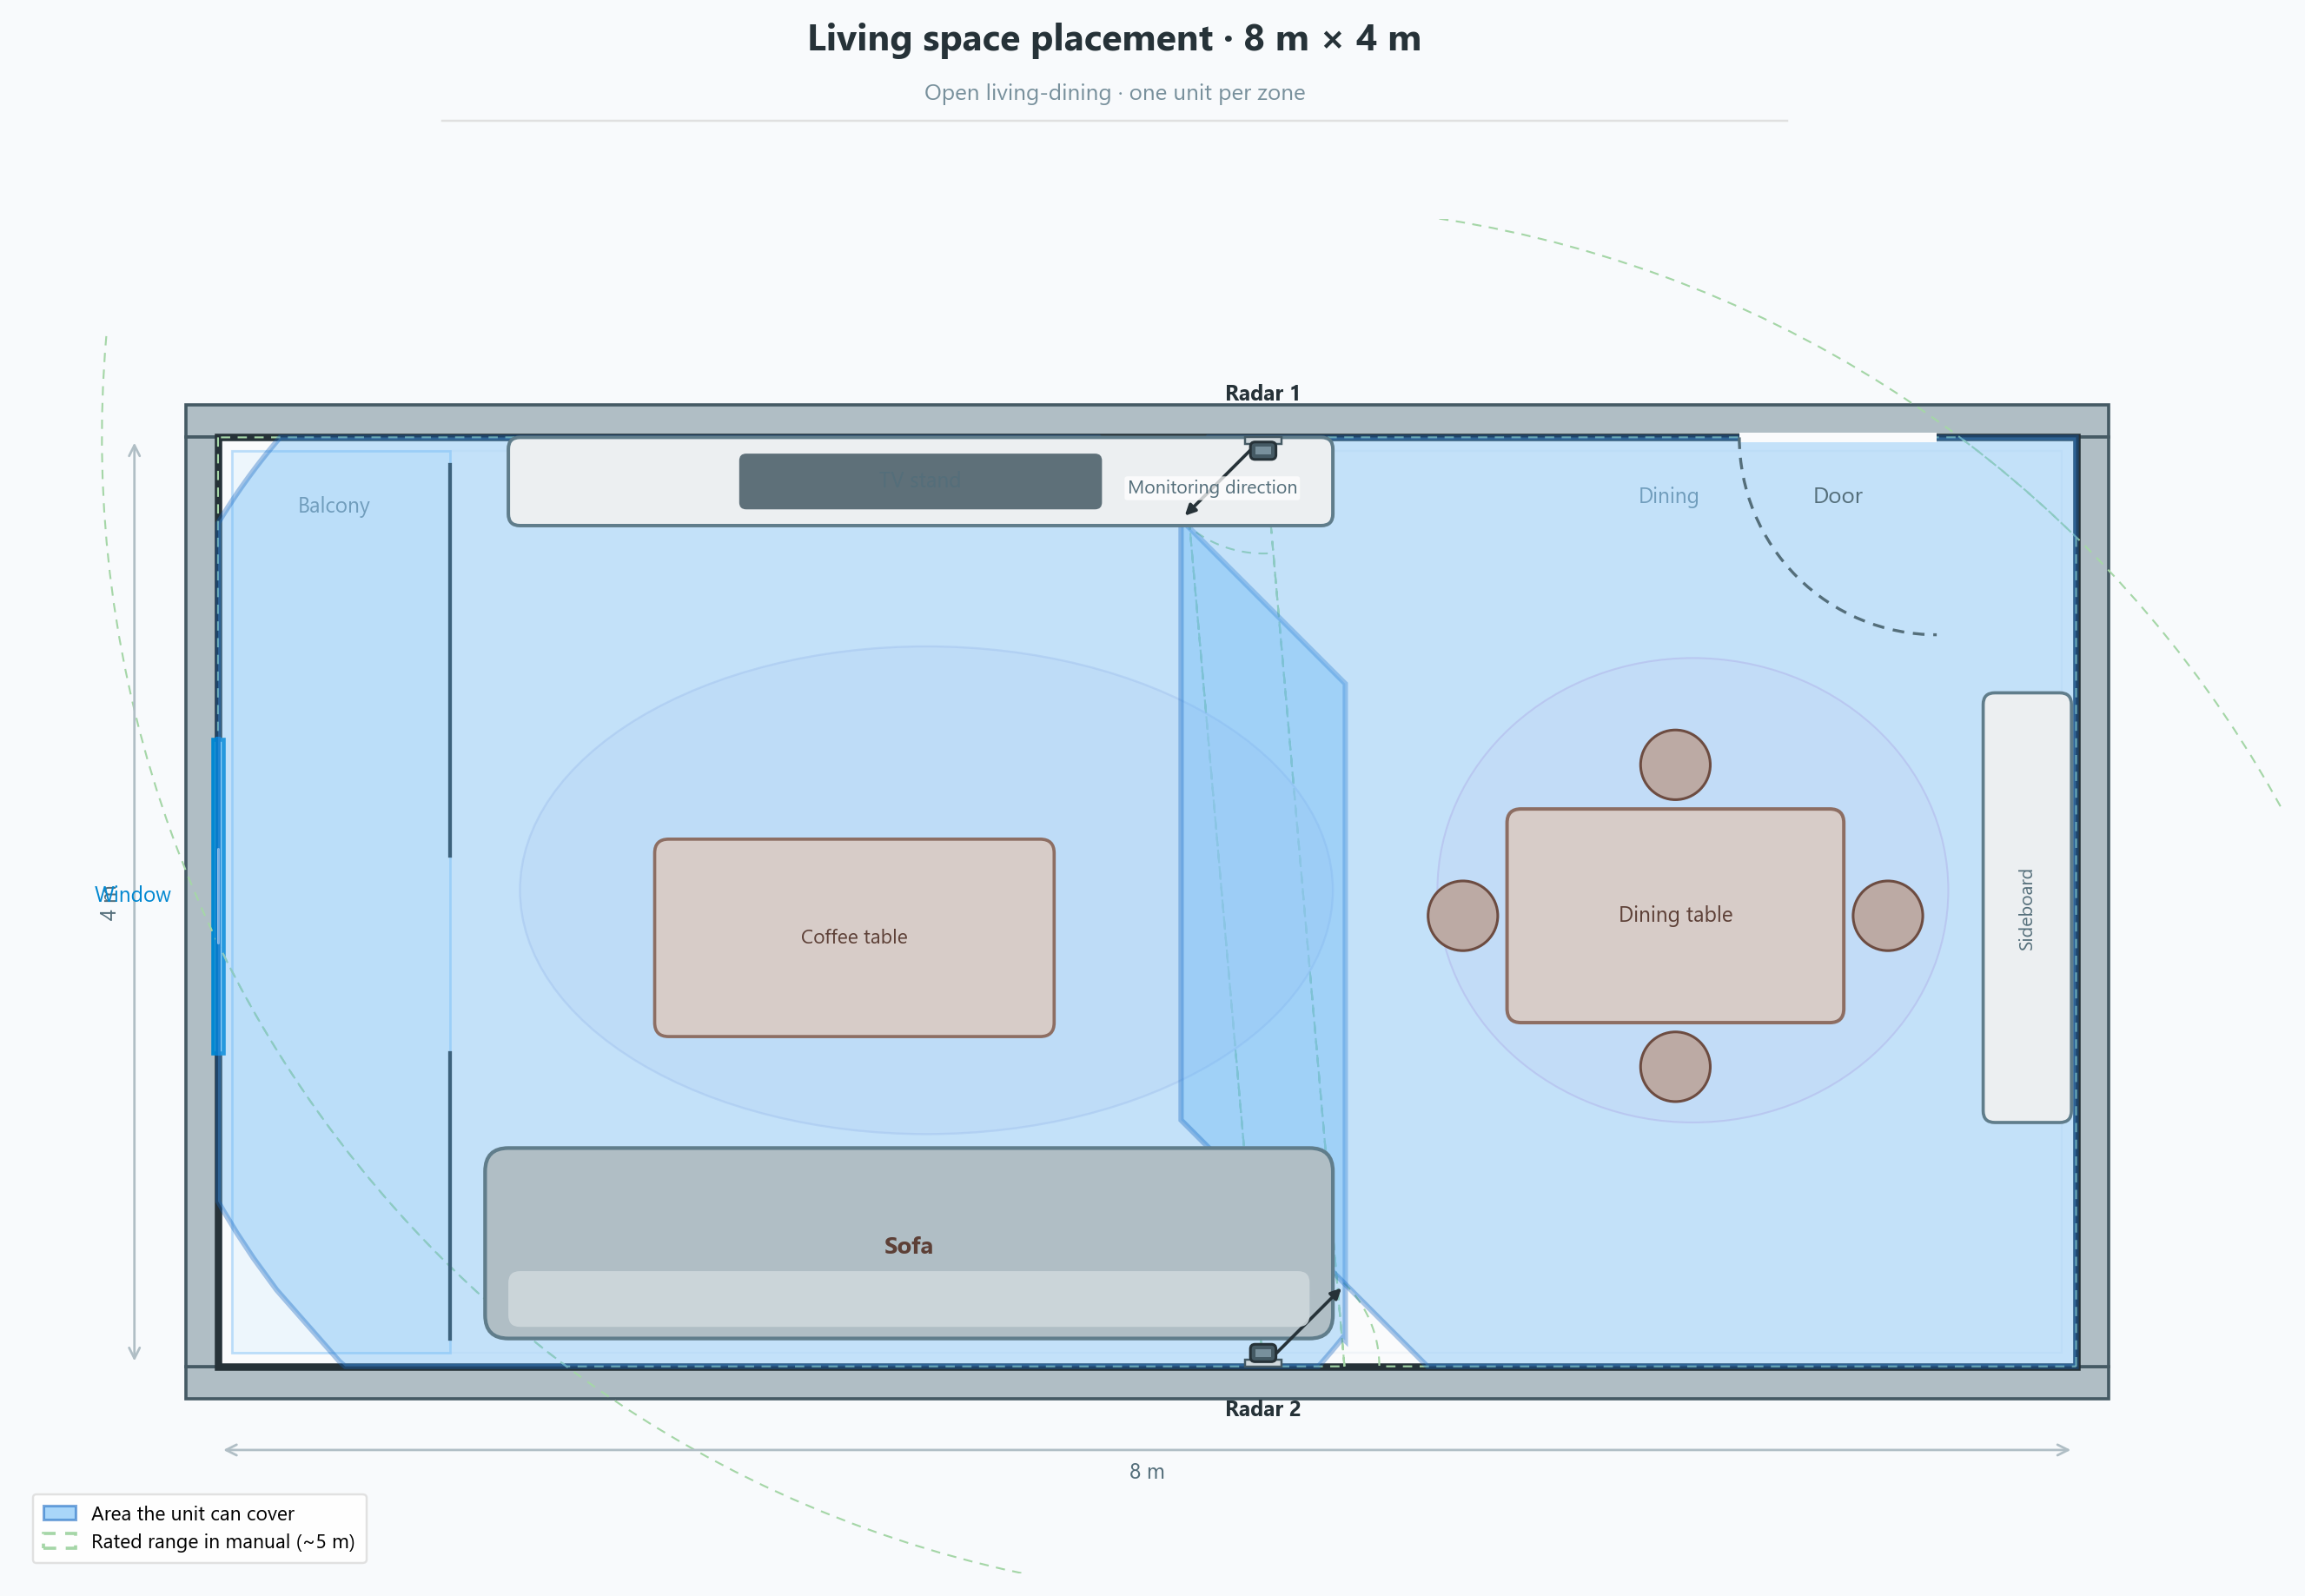
Example 8 m × 4 m open living-dining: 1 m balcony on the left; Radar 1 on the top wall at 4.5 m covers the living area, Radar 2 on the foot wall at 4.5 m covers dining; door on the top wall near the right. Blue = area the unit can cover; green dashed = rated range in the manual.
C. Corridors / narrow spaces
- Start at the end corner (example: bottom-left), beam 45° to the right; add a unit on the opposite wall near the far end (example: top wall at x≈9 m), beam to the left back into the walkway; overlapping zones in the middle
- Longer corridors: ~5 m spacing, alternate sides; slight overlap between zones
- Avoid face-to-face beams (§7.3)
- Add units if width exceeds one blue zone
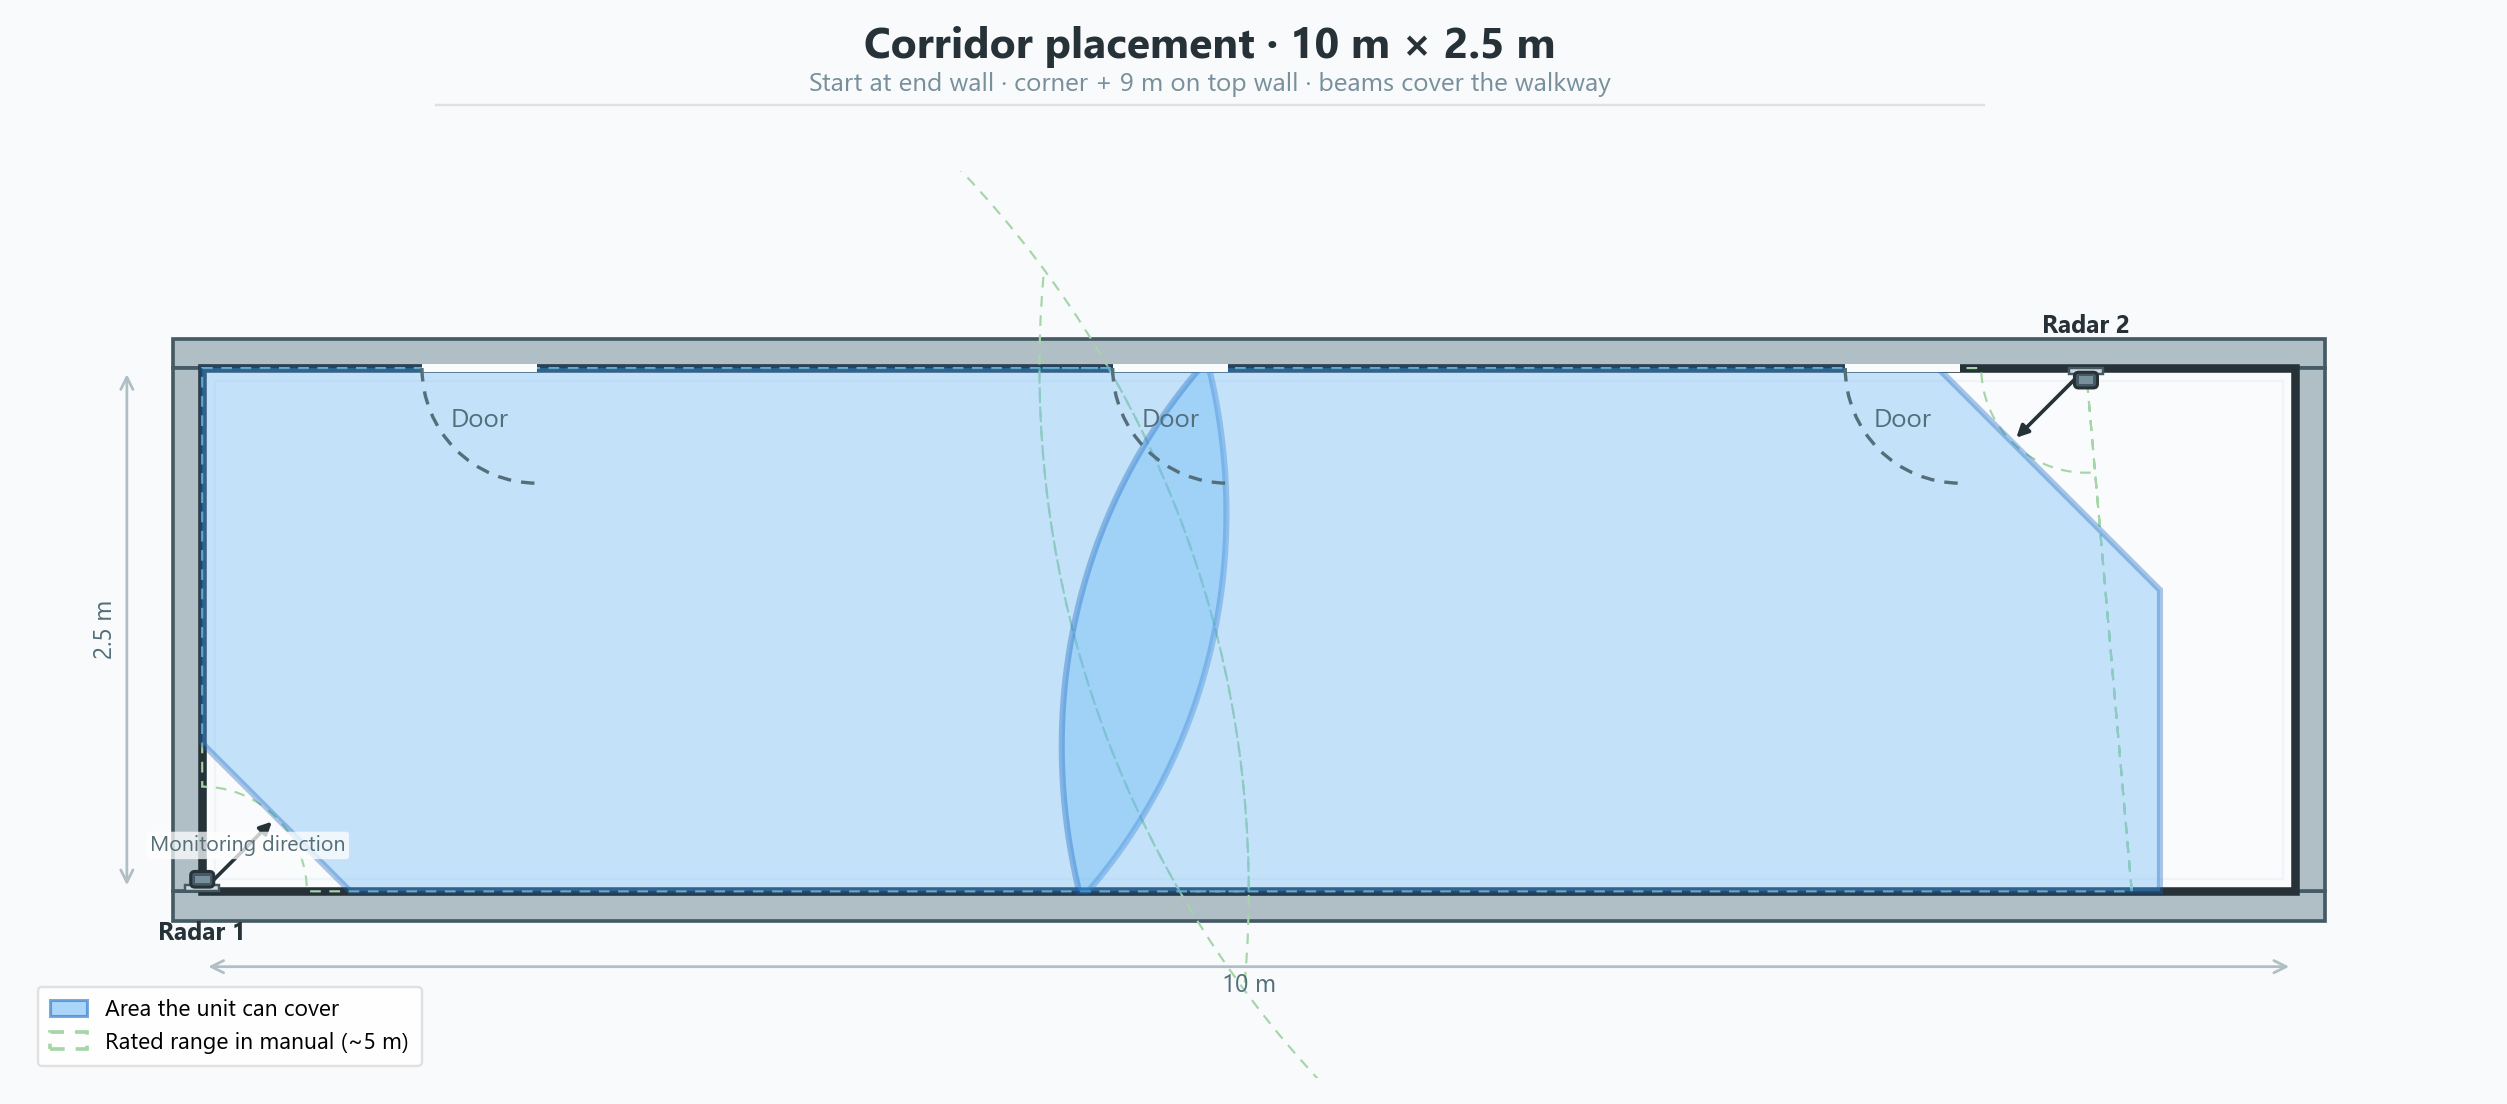
Example 10 m × 2.5 m: Radar 1 at the bottom-left corner, 45° to the right; Radar 2 on the top wall at 9 m, beam to the left; both ends cover the walkway with overlap in the middle.
D. Large spaces / multi-radar
Examples: large living room, activity hall, lobby, open office, large retail floor.
When one blue zone clearly cannot cover the main activity area, add multiple units under the same room in the platform: account → home → room → radar.
| Pattern | When |
|---|---|
| Top/bottom wall segments | Long rectangular rooms: units on top and bottom walls (07-04 14×8 m, 6 units — top at x=0.2/4.7/9.2 m all facing right 45°, bottom at x=4.7/9.2/13.7 m all facing left 45°) |
| Four corners + mid pair | Four corners inward plus one more on top and bottom at the same x to strengthen center coverage |
| Four corners inward | When four units suffice; one per corner, beams inward |
| Center four-way | Central column/island: 4 units at center facing right / up / left / down (see 07-05 10×6 m) |
| Wall segments | L-shape, partitions, separate activity islands |
Multi-radar rules:
- Activity hall / lobby example (14 m × 8 m, below): 3 on top wall (x=0.2 m, 4.7 m, 9.2 m), all beams 45° to the right; 3 on bottom (x=4.7 m, 9.2 m, 13.7 m), all 45° to the left (6 units total); opposing coverage overlaps in the center
- For longer rooms, continue segmenting top/bottom walls at ~4.5 m spacing; still avoid face-to-face beams between top and bottom
- Plan each unit with the S2 strict boundary, not only a 5 m circle
- Avoid face-to-face beams; if unavoidable, ≥ ~10 m spacing
- Wall segments vs corners vs center four-way — depends on layout and coverage goals
- Each unit is added and calibrated separately in the same room
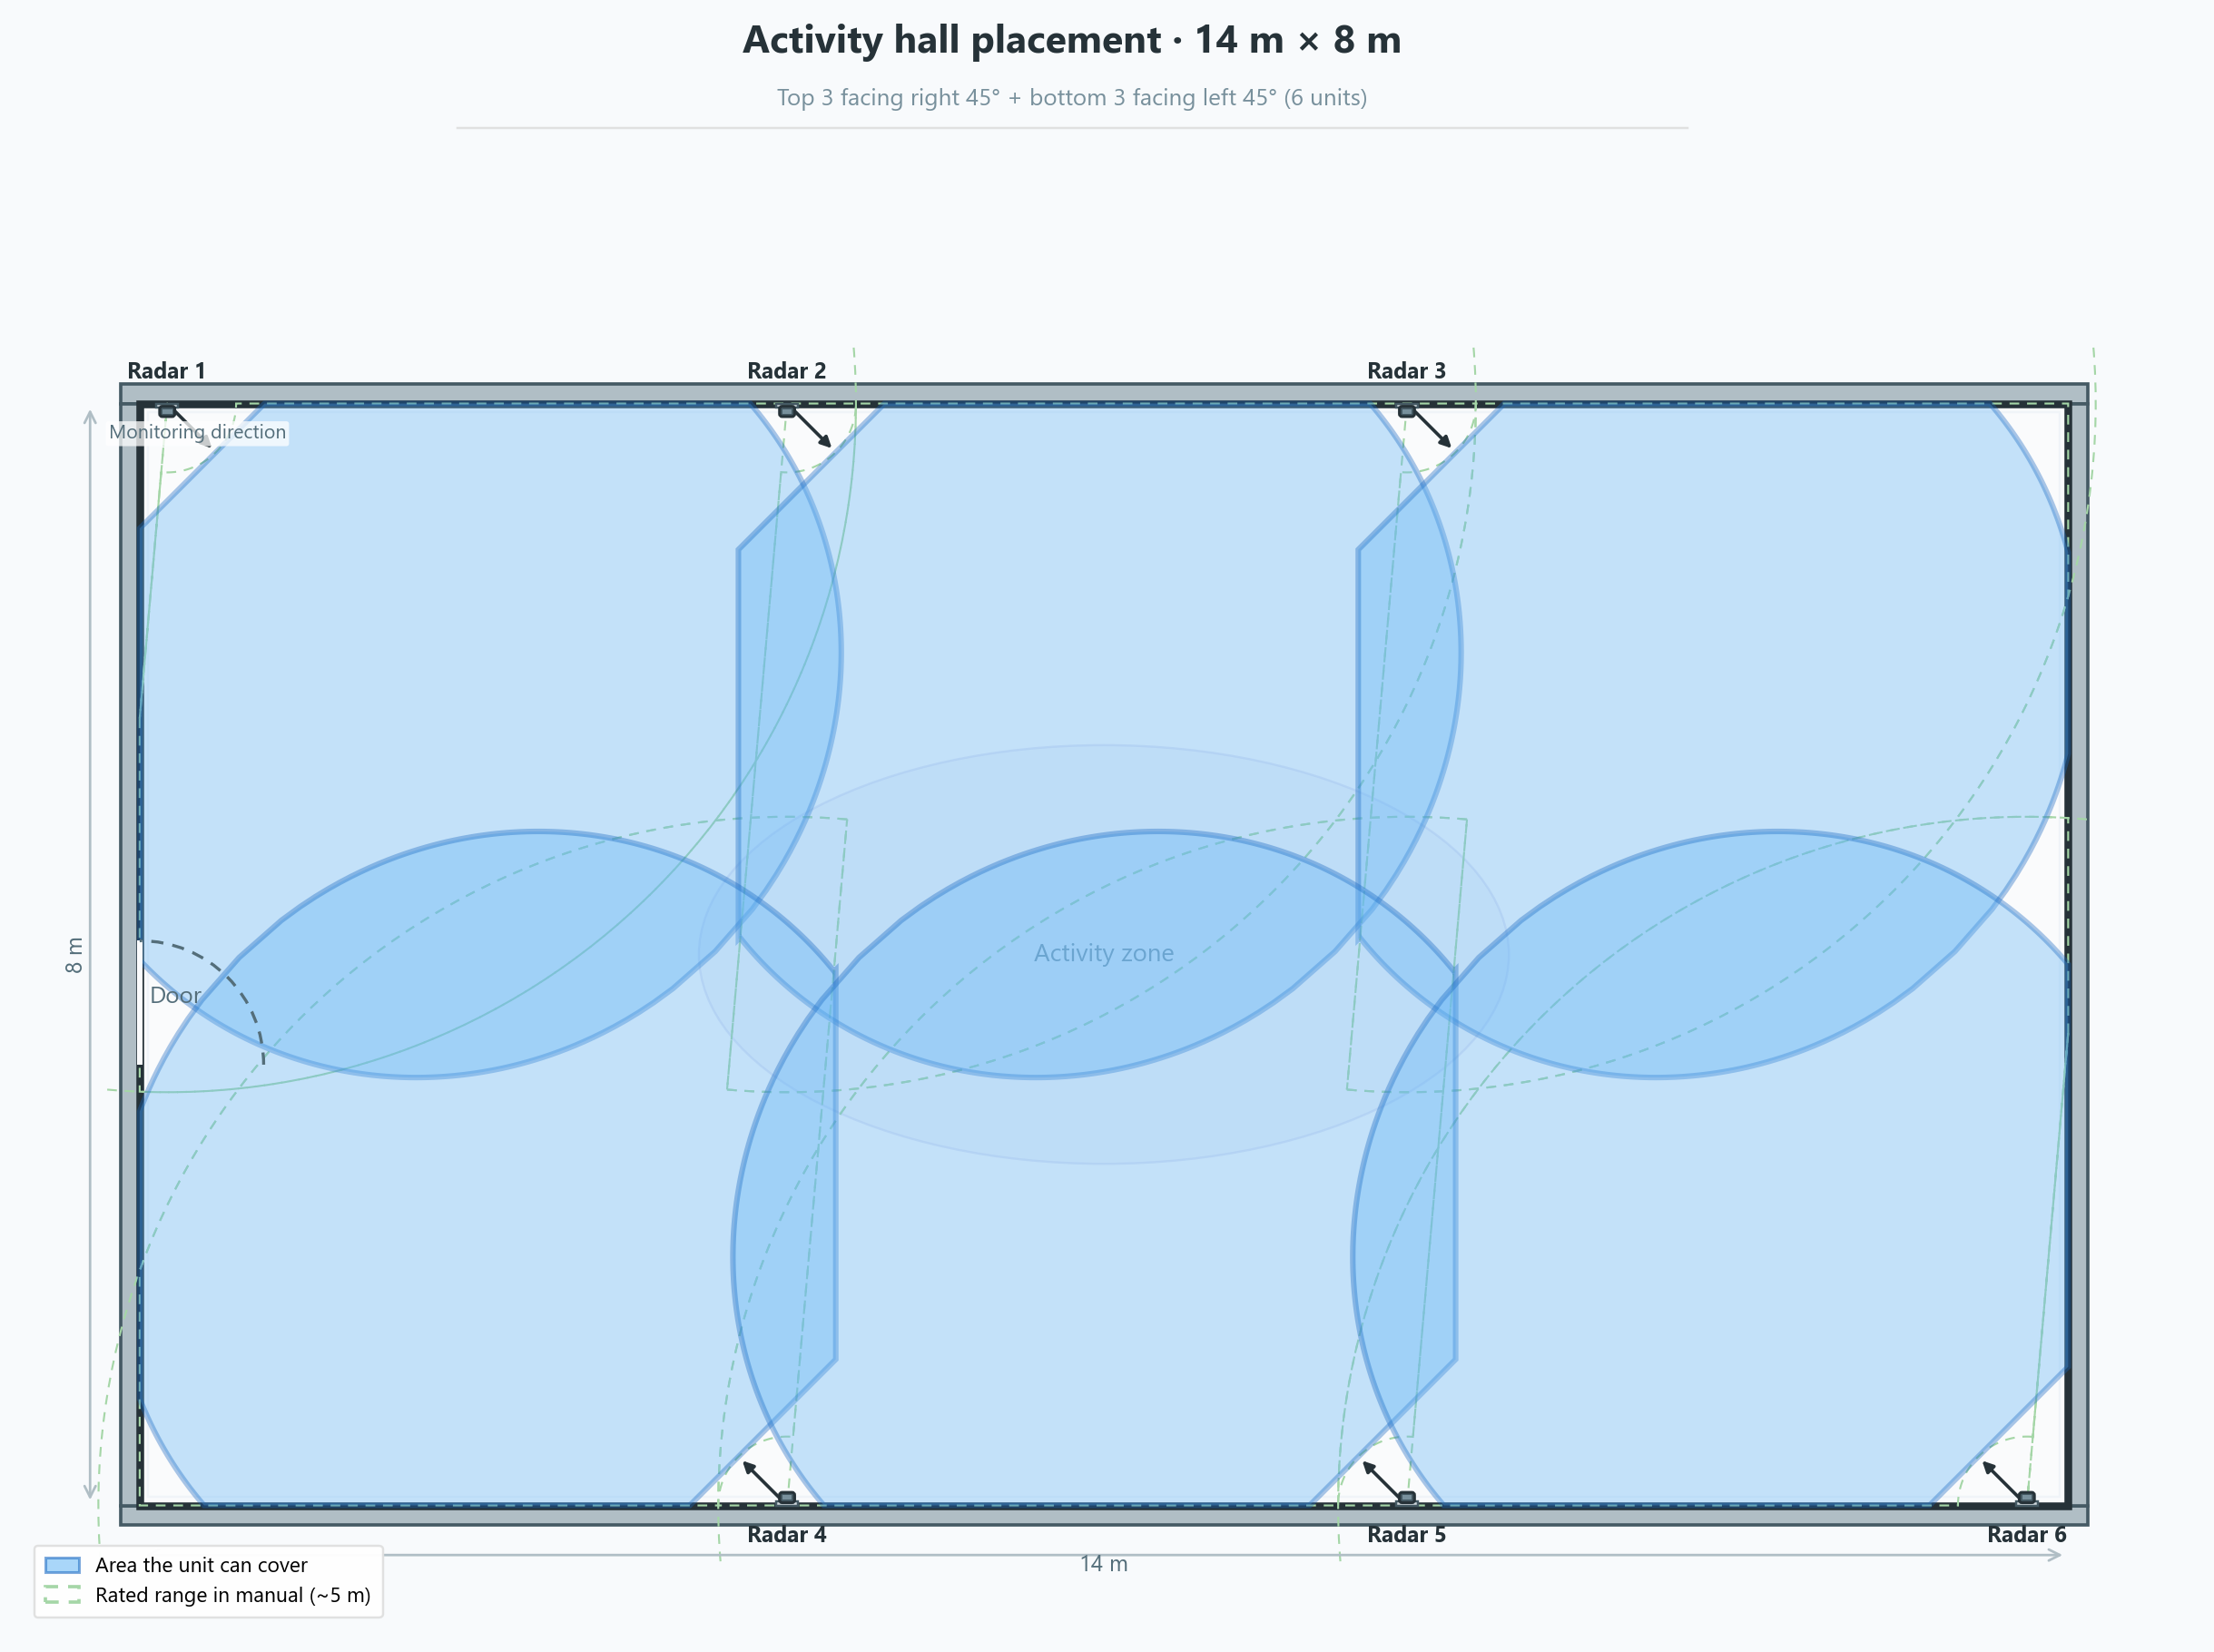
Example 14 m × 8 m activity hall / lobby: 3 on top wall, all 45° right (x=0.2 m, 4.7 m, 9.2 m); 3 on bottom, all 45° left (x=4.7 m, 9.2 m, 13.7 m, 6 total); overlapping blue zones over the central activity area. Blue = area the unit can cover; green dashed = rated range in the manual (~5 m).
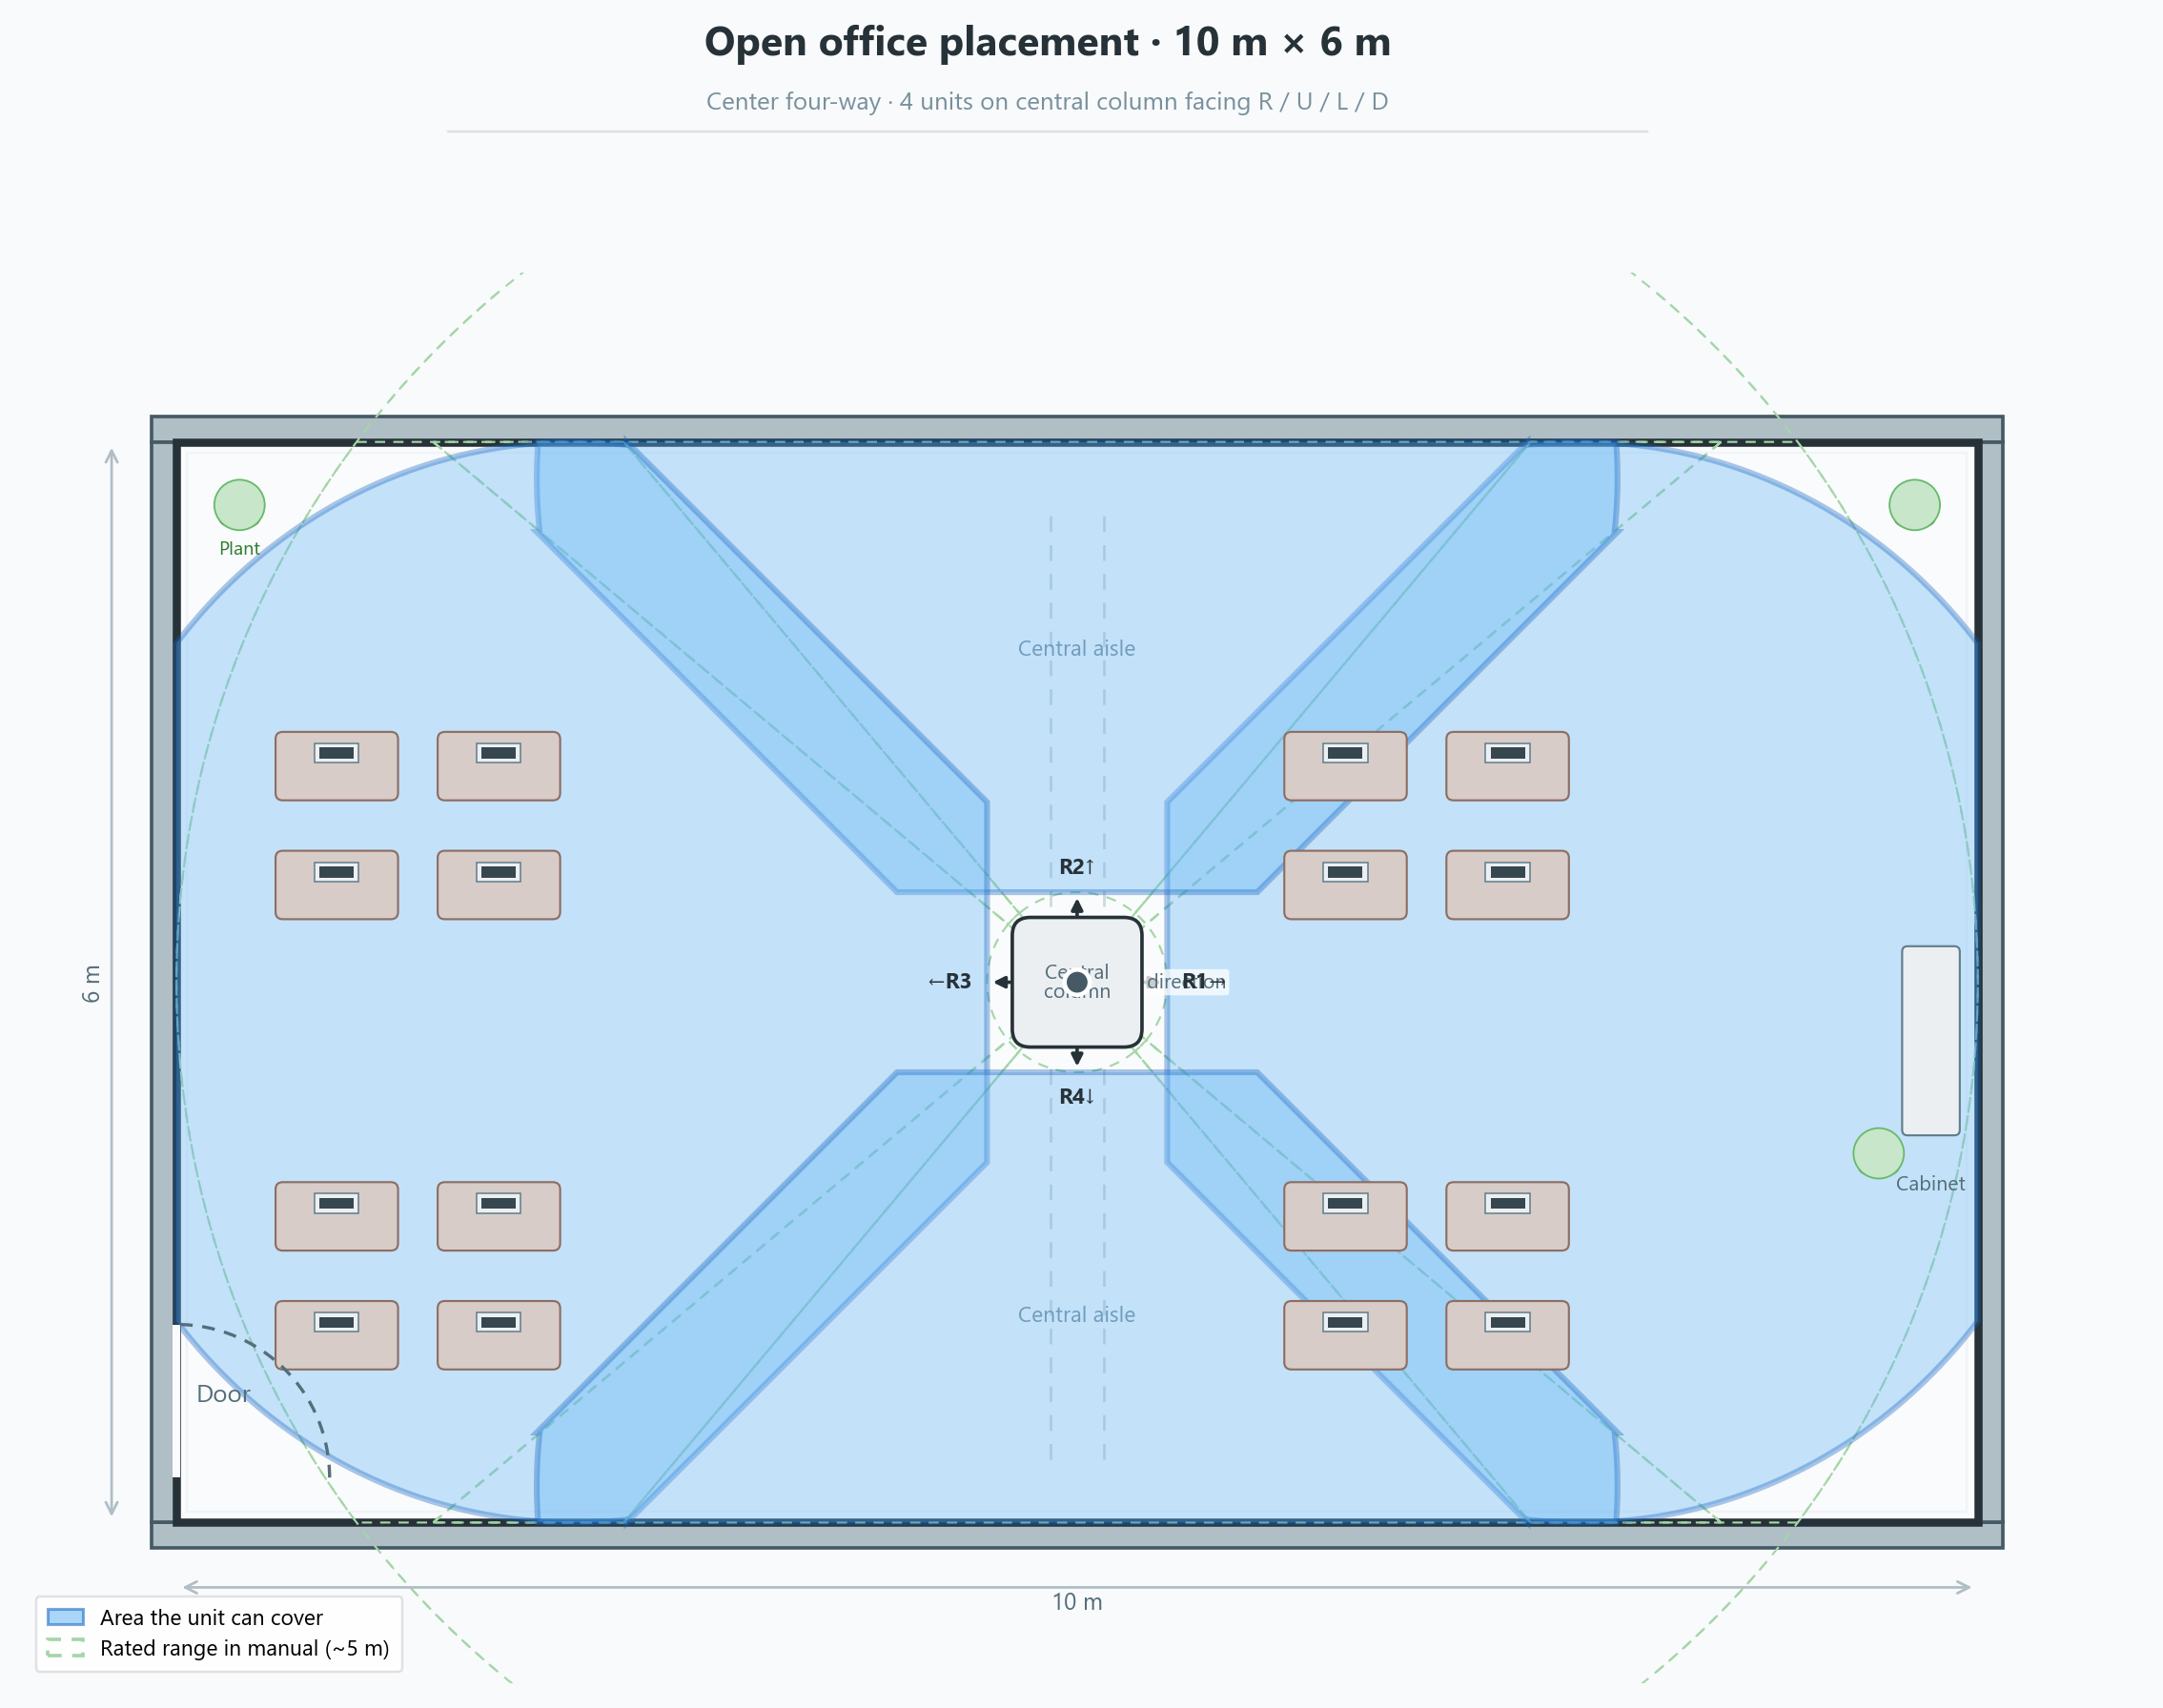
Example 10 m × 6 m open office — center four-way: 4 units on a central column, beams right (0°) / up (90°) / left (180°) / down (270°); covers desk zones and aisles on all sides with overlapping blue zones at the center. Blue = area the unit can cover; green dashed = rated range in the manual (~5 m). Large retail floors: add units by activity zone.
7.3 Scenario index
How to use this section: On site, decide from floor dimensions and layout first (length × width, corridor-like or not, central column/partitions, where people move), then map to §7.2 shapes A–D and layout patterns (single wall, top/bottom segments, four corners, center four-way, etc.). Draw blue zones on a plan, then set unit count. Scenario names (bedroom, hotel, office…) are examples only — the same use case at different sizes or furniture layouts needs different placement and unit counts.
By size + layout (primary)
| Scale (guide) | Shape | Layout pattern | Units | Example |
|---|---|---|---|---|
| Small, one zone, ~≤5×5 m | A or B | Single side/end wall | 1 | 07-01 bedroom |
| Medium, two zones, ~8×4 m | B | One per segment on top/bottom or side walls | 2 | 07-02 living-dining |
| Narrow, long ≫ wide (e.g. 10×2.5 m) | C | Corner start + opposite wall segment; overlap in middle | 1–2 per segment (add ~every 5 m) | 07-03 corridor |
| Large rectangle, e.g. 14×8 m | D | Top/bottom segments (or corners + mid pair) | Plan by ~4.5 m spacing; example 6 | 07-04 activity hall |
| Central column / island (e.g. 10×6 m open office) | D | Center four-way (4 beams R/U/L/D) | 4 | 07-05 office |
| Very large / irregular | D | Wall segments by activity islands | On map | §7.5 planner |
One unit enough? If the strict blue zone covers all must-monitor floor — effective depth ~0.5–5 m, ~100°; large rooms or diagonal activity usually need more units.
Common scenarios → shape (quick lookup)
| Scenario | Usually | Must cover | Notes |
|---|---|---|---|
| Home / hotel / care bedroom | A | Bed + path + floor | Often 1; still draw zones if layout is unusual |
| Living / dining / lounge | B | Main activity + floor | ≤5×5 m → often 1; 8×4 m open plan → see 07-02 |
| Corridor | C | Walkway floor | Segment; avoid face-to-face beams |
| Activity hall / lobby / large living | D | Full-floor activity | Size drives segment pattern (table above) |
| Open office | D | Desks + aisles | Center four-way if column; else wall segments |
| Retail / lobby | D | Foot-traffic floor | Plan on map |
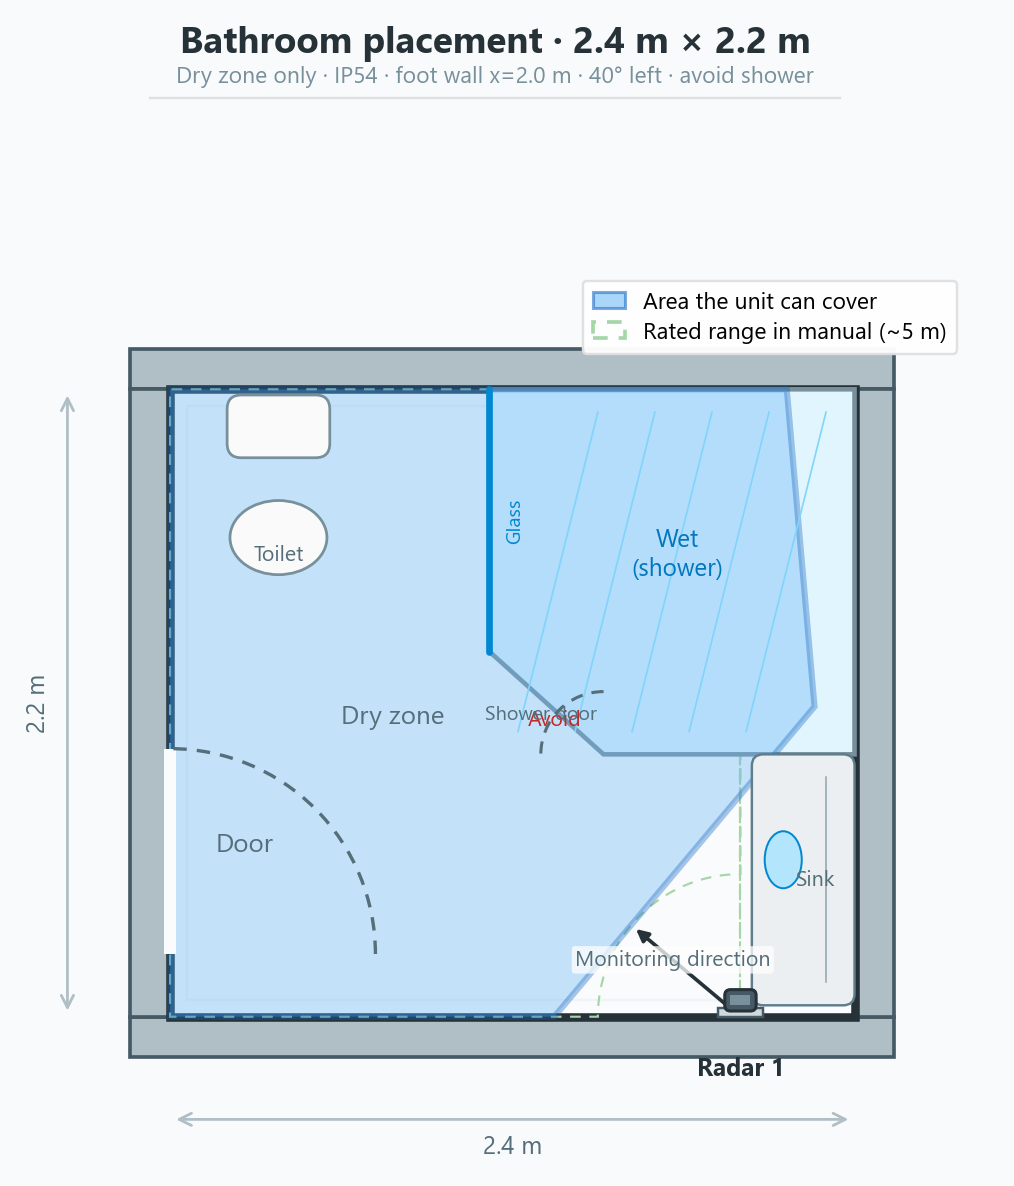
| Bathroom | — | Dry-zone floor only | 0–1; §7.4, 07-06 |
7.4 Special spaces
- Bathroom: dry zone + power only; IP54 — no direct spray / long-term humidity
- Low ceiling: assess height before tilt mount
7.5 Interactive planner
Click a coverage zone to select. Drag the dot to move; drag the red arrow tip to rotate. Blue = strict boundary; green dotted = ~100°/5 m reference.
Blue = actual coverage (strict boundary); green dashed = rated FOV (~100°, 5 m). Click a zone to select; drag ● to move, ▶ to rotate.
Drag ● to move · drag ▶ to rotate
Selected radar #1
45°Bracket ±45° on site; full angle here is for planning only.
Platform hierarchy
Multiple units in one physical room: account → home → room → radar — add each device, enter height, run S5 calibration.